Monday, March 8, 2010

Drunkard's Path Tutorial

For my February blocks for A Piece of Work-A and March blocks for Bee Addicted, I sent out these gorgeous fabrics.


fabric for APOWA February

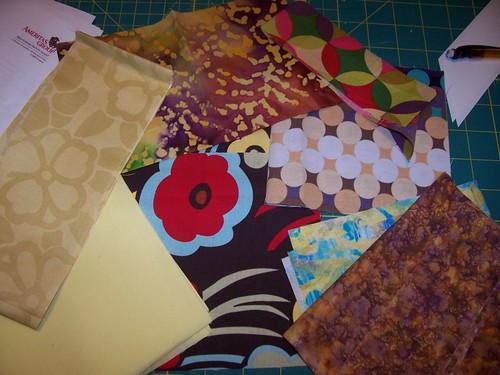
Each person was sent a cream print, two different semisolids, and lots of the floral print.

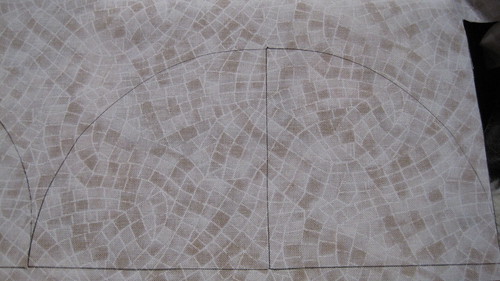
I am asking for Drunkard's Path blocks that are 16.5 inches (16 inches finished).

Here are some hints and helps for making these as I know that some people are not comfortable or familiar with doing curved piecing.

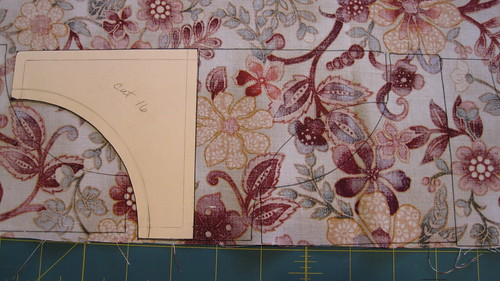
Everyone received two templates. One is a quarter circle. The other is the outer piece of the square. The templates include seam allowances. You will need to cut out 16 of each piece from the fabrics you received. The floral print is the main fabric, so please make sure you use a lot of it.

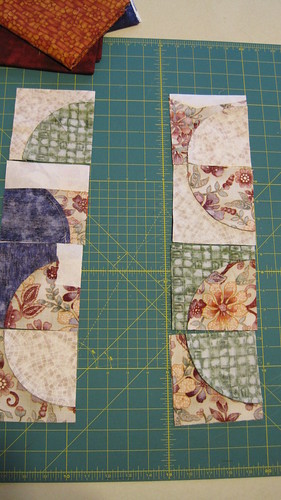
Because of the curves of these pieces, you will need to trace the templates and then cut them out with scissors instead of a rotary cutter (unless you are really good). I used a pen to trace the templates because some of the fabrics were so dark and I was going to cut on the lines anyway, so decided it didn't matter. Here is how I laid out the pieces, in order to conserve space/fabric. I think it will make it easier to make a balanced layout if you stick with even numbers of each piece per fabric.

Template Layout

Template Layout

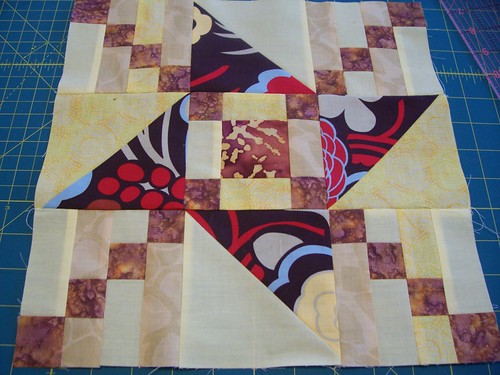
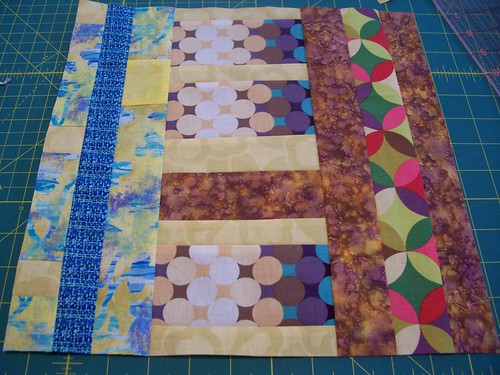
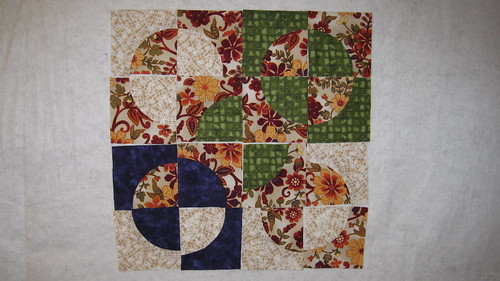
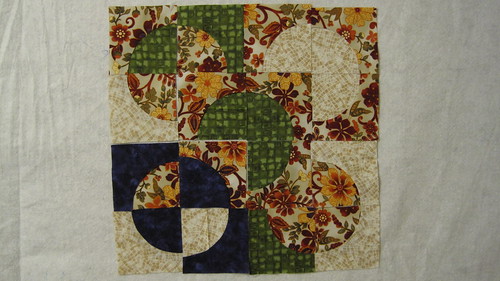
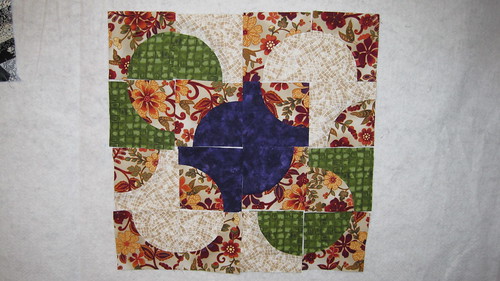
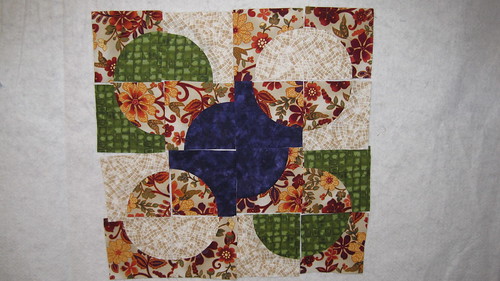
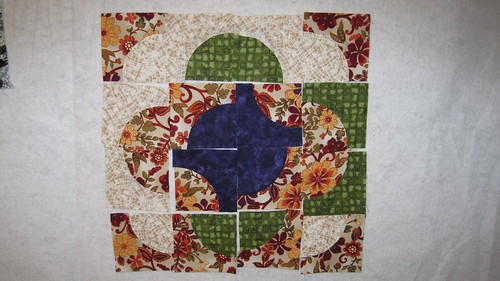
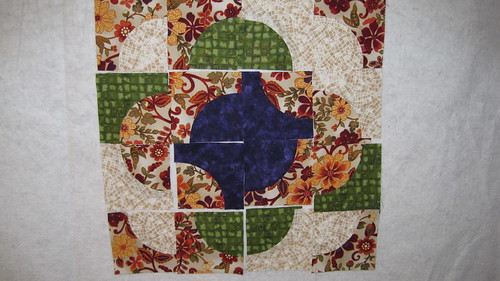
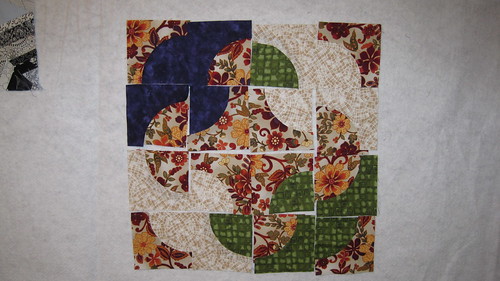
Once you get all the pieces cut out, the fun begins! This is when you get to play with different layouts. You can lay the blocks out however you want. There are some traditional layouts, but I want to see what you can come up with. Here are some of the layouts I tried.

Layout Option 1

Layout Option 2

Layout Option 3

Layout Option 4

Layout Option 5

Layout Option 6

Layout Option 7

Layout Option 8

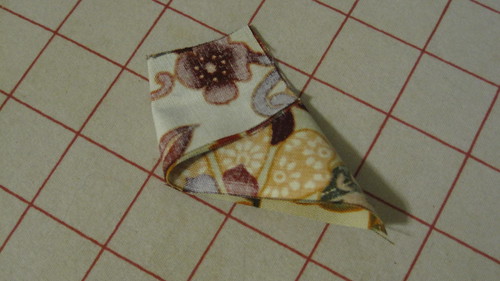
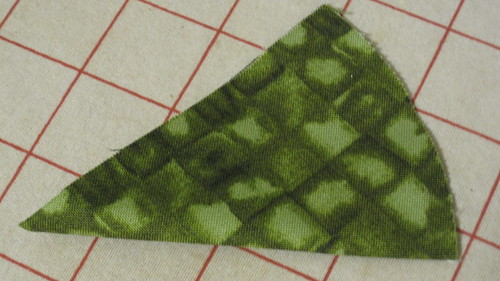
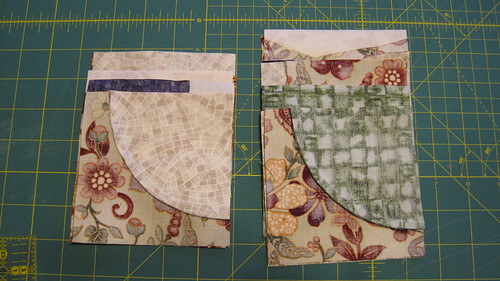
Once you have your layout picked out, it is time to start piecing. First you will want to fold each piece into fourths and press it. This makes it easier to match up the pieces evenly.

This is what the outside piece looks like when it is folded in quarters and pressed.

Creases

And this is the quarter circle once it has been folded and pressed.

Creases

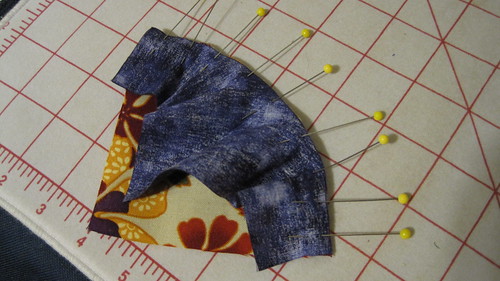
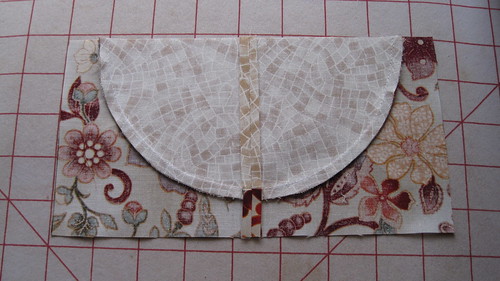
Next you line up the creases and the edges and place a pin at each location. You want the quarter circle on the bottom and the outside piece on top.

First set of pins

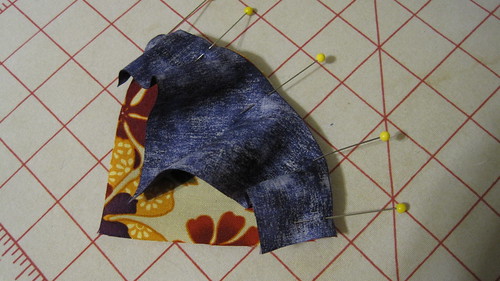
Then, place another pin between each of the pins you already have. The top piece should be a little flatter along the seam line now, with only a few small bumps.

More pins

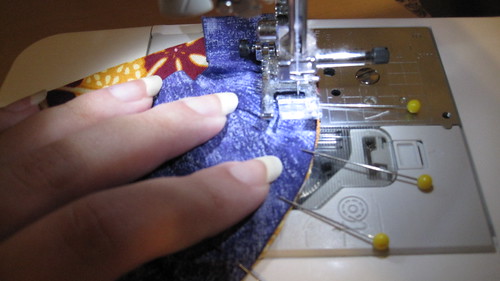
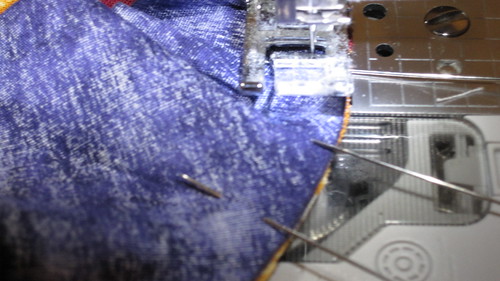
Now it is time to sew the two pieces together. Don't try to line up the edge of the fabric to your quarter inch mark ahead of the presser foot. You will be pivoting the fabric the whole time you are sewing. You want it to hit the seam allowance mark just ahead of the needle. Take your time. Sew slowly. Be grateful there are only 16 of these...

Sewing the block.

Sewing the block

Once the pieces are sewn, press both seams toward the outside piece.

Press seam toward outer piece

Square up each piece to 4.5 inches. The seams should fall 1 inch from the edges of the square.

Square up to 4.5 inches

Now it is time to start piecing the squares together. Here is how I keep track of what goes with what and where while I am piecing.

First lay out your squares again.

Layout

Then, I take the second column of squares and match them right sides together with the blocks in the first column. I do this as well with the fourth and third columns. This puts all of the seams on the right hand side of each stack.

Right sides together

Then I stacked each column of squares from bottom to top and sewed them in this order.

Ready to sew

Press seams open.

Press seams open

Continue piecing the blocks together to make 4 4-patches. Press seams open. I find for me, that piecing into successively larger squares, instead of rows, helps me match my seams better. Of course, piece however you wish.

Four 4-Patches

Then join the 4-patches into the two halves and join the halves.

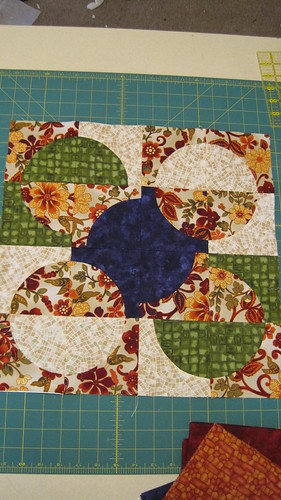
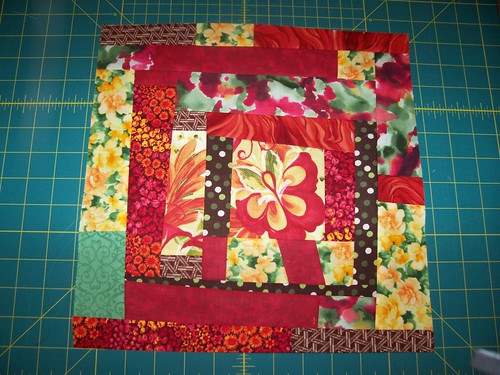
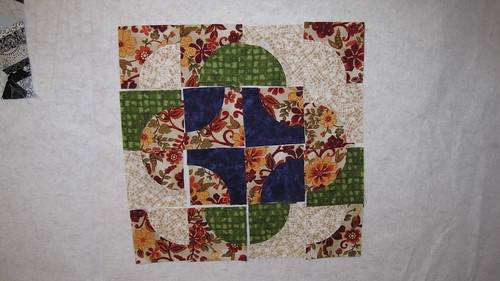
Ta da; pretty block.
453

Sunday, September 6, 2009

I am an Aunt!

On Friday at 5:25 Lily Vienne Lemmons was born making me an aunt for the first time. She was 9lbs. 1 oz. and 20 inches long. She has a full head of hair and really long toes. She is soooo pretty. I got to hold her for over an hour at the hospital yesterday. Here are some pictures that Chris took while we were there.

Lily and Aunt Melissa

LIly and Aunt Melissa

Lily and Aunt Melissa

Monday, August 17, 2009

What I've been working on

A couple weeks ago I scored 14 yards of brown twill for $6/yard on-line. I bought this fabric to slipcover our two old, mismatched, thrift and gift couches. The couches were seriously due for some new looks. Last night I finished (almost) the first slipcover.

Front of the newly slipcovered couch
Front

Back of the slipcover
Back
I started with the biggest couch. It has a lot of curves and was pretty complicated, but I am very happy with the outcome. I wanted the slipcover to truly be a SLIP cover, as in it can be taken off. With all of the curves, this was not very easy. It meant that there had to be at least one seam that could open up and close again, preferably with out the aid of a seamripper and needle and thread. I ended up only having one recloseable seam and it is fastened with neodymnium magnets. They work wonderfully.

Magnetic closure

There was one slight problem though. Right above that seam do you see the serger threads hanging out? That is where I somehow ended up with both sides being too short. There wasn't enough fabric on either side to cover the raw edges and tuck into the crack. I am going to have to sew some of the scraps onto those edges whenever I decide that I have the energy and motivation to take the cover off and put it back on again inside out, pin up all the edges, and hem the whole thing. That is not right now.

Hey, did you notice how crisp and square and firm that cushion looks? And that it is only one cushion? The old cushions were definitely showing their age, even through the slipcover, so I took advangtage of a 40% off sale at Hancocks and bought two new sheets of foam. Both couches are getting new cushions. Ahh, it is soooo much more comfortable.

The next slipcover should be much easier. There isn't a single curve on the other couch at all. And it is significantly smaller in every dimension. Maybe tomorrow night...

Tuesday, August 4, 2009

August Blocks for Quilt 12 Together

Yesterday I got the fabric for the first month of the bee that I am hosting called "Quilt 12 Together." All of the ladies are from the Ravelry Quilters Knitting group except my MIL.

August is Dawn's month and she sent out a lot of fabric. She divided her chosen fabrics into blue bundles and gold/brown bundles. I got a brown one.

Dawn's fabrics

She told us pretty much anything we did would be great, but that she liked stars, pinwheels, irish chains, nine-patches, and strippy blocks, and even more.

I picked up on the star/pinwheel and irish chain idea and remembered having seen this block on Ravelry for a recent block swap they did. This pattern makes a 9 inch block and Dawn wanted 12 inch blocks so I modified it just a little bit, making the center block an uneven 9 patch and the corner blocks have 4 block instead of 3. This is what I came up with. I threw in a little bit of yellow I had leftover from Emerald's quilt.

Block 1 for Dawn

I still had a lot of fabric left so I made a strippy block. I think it is fun.

Block 2 for Dawn

Monday, July 27, 2009

A Piece of Work August

Today I received the August shipment of fabrics for the quilting bee A Piece of Work - A from Kaylynne.

Aren't they so pretty? Deep red/pink, yellow, green, orange, and brown. So rich.

APOWA Kaylynn's August Fabric

She asked for wonky log cabin blocks and this is what I came up with. She encouraged us to add fabrics from our stash. I added the brown and tan print, the green in the corner, and the orange swirls. This was a lot of fun!

Block for Kaylynne APOW-A

Sunday, July 26, 2009

Orange and Blue, Yellow and Green

Jonn's quilt has been delivered.

Big Smile

Big Smile

Here are some detail shots of the border.

Border

The KEDT-TV Challenge was a academic decathlon type event held by the local tv station in which the various local school competed. John was on his school's team. You can watch episodes here and here.

Border

NOSB stands for National Oceanic Science Bowl, another academic event John participated in.

Border

I couldn't find a machine embroidery design for National Honor Society, but luckily, John had an extra patch. I fused and satin stitched that to one of the blocks.

Quilting detail

Quilting detail on back

On John's quilt I did "vertical" lines in blue and orange through the center. I made no attempt to keep the lines straight or non-intersecting. It was fast, but it could have used some more lines. Maybe, I don't know. I was afraid I was going to mess it up if I did any more.

Quilting detail

On the border, I stippled in white including five pointed stars every now and then. This was a fun change from regular stippling.

Julia and Marnie threw a baby shower for Emerald yesterday at Julia's house. It was Abilene friends and the ladies from church.

054

She got a nice pile of presents, including lots of wipes.

Front of the quilt

I gave her this quilt. This is the Mod Sampler quilt by Elizabeth of Oh, Fransson. I completed the whole quilt in three days. I will probably make more of these. The blocks are really simple, yet striking.

Pink Layette included

With this handknit layette inside. This is the Matinee Coat by Debbie Bliss, Feather and Fan Bonnet, and Saartje's Booties. I used Sandes Garn Mandarin Petit for this project. This is a really nice cotton fingering weight yarn. I would definitely use it again.

Looking at the back

The quilt is 55x65 so it will make a good playtime quilt and can be used even after the baby gets bigger.

quilting detail

I free-handed vines of flowers and leaves all over the quilt, using Sulky variegated rayon thread. That thread comes on really small spools. I completely used two spools and still had 1/4 of the quilt left to go!

Label

I "wrapped" the present by folding the layette inside the quilt, folding back top layer to show the label and tying with a big yellow ribbon. The label says "Made by Aunt Melissa for her very first niece. July 23rd, 2009.

Doesn't Emerald look so cute?
058

Those sandwhiches on the croissants are mimicing ones that we buy from Tuscany's. They are sliced turkey, cream cheese, and cranberry sauce with walnuts on a croissant. Very yummy.